Thursday, September 29, 2011

helping a headache without pills- day 1

skullcap- great for headaches!

Headaches are annoying. They get in the way of feeling productive and healthy, and frankly, are no fun. And they are unfortunately common because of their many causes, including low blood sugar, dehydration, allergies, constipation, eye stress, emotional tension, too much alcohol, not enough sleep... the list goes on.

But I also hate taking a pill every time a headache appears. Most pills may give relief eventually, but take time to get into the blood system. Also, they may treat the pain, but they do not get to the root of the problem. One pill cannot help every cause of every headache. Based on the many causes above, if it did it would be a wonder drug.

Because there are many headache triggers, there are also many solutions that can better treat each headache depending on its cause. So, when a headache hits, you first need to take an inventory of what is going on in your life.

1. Did you not sleep well?
2. Did you eat too many sweets or cold foods such as ice cream or drink too much alcohol?
3. Did you eat something that may have triggered an allergic reaction?
4. Have you been under a lot of stress, either physically or mentally?
5. Have you not eaten enough or skipped a meal?
6. Have you been staring at the computer or television screen all day?
7. Have you been drinking water or tea during the day?

me and my journal

At one point in my life, when my headaches began to get out of control, I began to journal my habits during the day. I would note what I ate, how I felt in the morning and at night, and if and when a headache hit. It helped me to realize that my eating habits were not as good as I thought they were, and that sometimes I did not drink enough water. Since then, I've found that many of my headaches are caused by a) not drinking water or b) eating something that triggered an allergic reaction.

If you've never kept a food/habit journal, I recommend trying it if you suffer from frequent headaches. If possible, have a small one so that you can have it with you during the day, so that you can write down notes without having to remember them when you get home. You never know what you will learn about yourself in the process!


Now, what to do about a headache if one happens to rear its ugly head?

Well, it's a little complicated, so bear with me. I'm going to deal with some remedies and activities first, and then follow up with another post on some other remedies and herbal blends. Otherwise, this post will be way too long.

Also, I'm not an expert herbalist or health practitioner, and so whatever I say is not the end-all be-all. There are many ways to relieve a headache, and some of them involve seeking other alternative help such as massage, chiropractic care, or other practices. However, based on my own experience, many of these remedies are worth a try and have no harmful side effects as long as they are taken in moderation.

lavender oil

1. Didn't sleep well? Try to find a way to fall asleep and stay asleep this evening. Take a lavender oil bath by adding lavender essential oil to a tub, or at least do a footbath with lavender oil. Convince your loved one to give you a shoulder or foot massage, and then cuddle up in a warm bed. Try a cup of chamomile and lavender tea while you are taking your bath too, and sprinkle a little lavender oil on your pillow before your head hits the pillow.

2. Had too many drinks or too much of that ice cream sundae? And then, afterwards, experience a craving for pickles or salty fries? You may be experiencing a "vascular" headache. Rosemary Gladstar recommends quickly eating salty foods such as a cup of miso soup or briney olives. Or, try an alkalizing tea such as a mixture of dandelion root, burdock root, and yellow dock root with some skullcap tincture. Now, I'm not familiar with this particular herbal blend, but I am of the believe that a cup of miso cures anything. And it's tasty too. You can find a recipe for that on my other blog if you click on the link!

3. When I ingest wheat, I get a headache that lingers. Headaches caused by allergies can be complicated to identify, but with some persistence and care they can be identified and prevented. If your allergy is pollen and mold related, it's best to try to control your surroundings. I'm no expert on this, but a cup of Headache Tea made with lemon balm, feverfew, and lavender will help (recipe to follow soon).

If it's a food allergy, first identify the culprit. This may mean going to an allergist and having them do a test, and possibly going on an elimination diet. These diets are a pain, but are extremely helpful in identifying foods that are triggers. I would have never realized I was allergic to wheat unless I had done it myself.

However, sometimes a headache is triggered unknowingly by allergies, and so drinking some chamomile and lavender  tea, relaxing, and eating simple foods such as vegetables, brown rice, and drinking lots of water can help to relieve this kind of headache.

If you like this post, you'll love my next one. Stay tuned and next week I'll talk more about stress headaches, dehydration, herbal tea blends, and the lovely herb skullcap. Can't wait to have you stop by again soon!

References:
A Modern Herbal- Chamomile
Rosemary Gladstar's Herbal Recipes for Vibrant Health

Wednesday, September 21, 2011

spice of life- cayenne pepper


Capsicum minimum. Also known as cayenne pepper. You may find it on your spice shelf or in a bowl of curry, or better yet, in a bottle of hot sauce served with that burrito. I have come to enjoy the feel of cayenne pepper in my mouth, that little tingle when there is just enough to feel the burn after a few bites of something spicy. My fiance is apt to pour hot sauce on many a dish, and I've begun to follow suit.

Here's why- cayenne pepper is more than just flavor. Capsicum can also be a remedy used to treat many ailments, including arthritis, digestion, fibromyalgia, headaches, coughs, and pain caused by nerve damage.

First and foremost, the energizing feeling you get from eating cayenne pepper goes back to its most important properties- its ability to increase circulation. It's why you might like to eat a big bowl of yummy curry on a cold winter's day. If you eat enough, you begin to sweat and can feel heat coming off of your body.

According to anniesremedy.com, cayenne pepper extract can be rubbed onto areas of the body that are affected by muscle or nerve pain, fibromyalgia, and arthritis. The pepper both increases the circulation to the area and counteracts the chemical used by nerve cells to transmit pain signals, helping to lessen pain. Cayenne also contains salicylates, which act like aspirin. The warmth caused by increased circulation can often be just as helpful as using a heat pack.


Ok, so you've just ordered a jungle curry from you local thai restaraunt, and after a few bites you begin to wonder- why the heck would anyone make something this spicy?

As I had mentioned, cayenne pepper can also aid in digestion by stimulating muscle movement which helps the acids in the stomach to digest your food. It can also be added to herbal remedies to help improve the circulation and absorption of other herbs as well.


You're starting to feel a little warm, and maybe a little sweaty from your jungle curry. Your nose might be a little runny too. This warming sensation can really help when you are congested or have a fever, as the peppers will release the mucus in your sinuses and help to sweat a fever out.

It can also help relieve the pain of a sore throat. This next recipe may sound disgusting, but so many people swear by it that I'll be trying this remedy when my next sore throat hits, which is inevitably soon as the weather changes.

Sore Throat Gargle

1 cup apple cider vinegar
1 cup strong (triple strength) sage tea
2-3 tsp. salt
pinch of cayenne pepper

To make the sage tea, boil a cup of water and then pour it over 3-4 tablespoons of dried sage. Let this steep for 30-60 min, and then strain it. Combine with the rest of the ingredients. Gargle this concoction frequently throughout the day to relieve your sore throat.

If sage tea isn't your thing, you can try a cup of lemon and honey in hot water with some cayenne pepper sprinkled in it too.


Cayenne pepper is so lovely, that I had to include a second recipe, one that is more tasty and useful for sprinkling on grains or salads. I found this one and the one previous in Rosemary Gladstar's Herbal Recipes for Vibrant Health.

Fire Cider Zest

1/2 cup chopped ginseng root, fresh or dried
1/4 cup freshly grated ginger root
1/4 freshly grated horseradish (this is hard to find, but try, it's really tasty! if not, you can find jars of horseradish at the grocery store, just make sure it's just horseradish!)
1/8 cup chopped garlic
cayenne to taste
apple cider vinegar
honey

1. Place the herbs in a glass jar. Pour enough vinegar to cover the herbs by 2 inches and sea the jar. Let this sit for 4 weeks.
2. Strain the herbs from the vinegar. Sweeten with honey to taste.


I can't wait to hear about any of the herbal remedies that you have tried to cayenne pepper. Let me hear about them!


Sources:
Rosemary Gladstar's Herbal Recipes for Vibrant Health
Annie's Remedy- Cayenne pepper
Discovery Health- Cayenne Pepper- Herbal Remedies

Sunday, September 4, 2011

bee hive mortar and why it's awesome


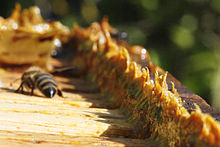
propolis resin from a bee hive

Propolis sounds regal, colossal, active. Heard of it before?

If not, you are not the only one, as I've just learned about it this past week. Propolis is the resin that honey bees collect from tree sap, buds, and other botanical sources in order to seal unwanted openings in their hive. It's like bee hive mortar, and looks a lot like ear wax. I recently discovered it in a tiny tin of Golden Salve which featured propolis as a main ingredient.

In the past, it was commonly thought that propolis simply sealed bee hives and protected them from the elements. However, according to Wikipedia and a study done by ecologists at the University of Minnesota propolis is now believed to:
  1. reinforce the structural stability of the hive.
  2. reduce vibration.
  3. make the hive more defensible by sealing alternate entrances.
  4. prevent diseases and parasites from entering the hive, and to inhibit bacterial growth.
  5. prevent putrefaction within the hive. Bees usually carry waste out of and away from the hive. However if a small lizard or mouse, for example, finds its way into the hive and dies there, bees may be unable to carry it out through the hive entrance. In that case, they would attempt instead to seal the carcass in propolis, essentially mummifying it and making it odorless and harmless.
 busy bees and their hive

Yes, well, that's great for the bees, you say. But what does this wonderous bee mortar have to do with me?

Well, the most important feature of propolis is its disease prevention and anti-bacterial properties. It is said that beehives are one of the most sterile environments known due to propolis. This is why propolis is included as an anti-microbial agent in my Golden Salve, along with comfrey, root, calendula, goldenseal root, yellowdock root, and balm of Gilead bud. What propolis kills in a bee hive, it will also kill on a new cut or old infection.


This anti-bacterial and anti-fungal property also aids in strengthening the immune system. However, one should be aware that results can be affected by how local the propolis is. Because its production depends on local trees and plants, the more local your propolis is the better it is. Also, be especially careful if you have a severe allergy to pollen or bees. You'll want to avoid causing a serious allergic reaction.

But for those unaffected by these allergies, don't be afraid to try propolis in capsule, tincture, tablet, or powdered form as many people swear by its ability to keep colds and flus at bay. Unlike antibiotics which can destroy both bad and good bacteria, leaving your immune system weakened, propolis only goes after the bad guys, sparing your good bacteria so that it can do its job.

Propolis also has many potential uses in dental hygiene. For instance, studies have shown that mouth rinse containing propolis has helped to speed healing after some oral surgeries, and may protect against oral diseases and treat canker sores.

As I haven't had any personal experience using propolis in its pure form, I'm not going to include a recipe in this post. But I encourage you to keep your eye out for propolis in tinctures, salves, and other herbal products. If you didn't know what it was before, now it won't be a mystery.


Friday, August 12, 2011

What to do with a bruise and a cut- first aid part II

On the way home from a trip the aquarium store, I tripped while getting onto the bus. At first, it didn't feel too bad, but as I sat down I looked down at my shin.

 major fail

Ouch.

A giant, blue bruise was forming. There was a long scratch on the front of the bruise. I instantly thought "Where's my arnica?" Luckily, I had some homeopathic tablets in my purse, and so I threw a few under my tongue.

But, oh it hurt. It hurt so much that when I got off the bus, I felt faint. The blood rushed from my head, and I felt weak in my knees from the shock.

I staggered across the street to the nearest bar and babbled nonsense to the host about ice and a bus and fainting. He backed away because he probably thought I was crazy, but went to the back of the restaurant and came back with a plastic bag full of ice. I thanked him and sat under a tree with the ice until I felt ready to stand.

Now, where to find something to put onto my owie?

Whole Foods to the rescue!

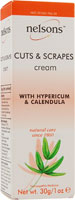
Luckily, Whole Foods was across the street, and so I limped to the first aid section of the store. Unfortunately, they did not have as much selection as I would have hoped. They had arnica, but I couldn't put that on my open wound. Muscle rub wouldn't help to disinfect the cut. The only thing I could find was Nelson's Cuts and Scrapes cream with Hypericum and Calendula.


The label claimed to promote rapid healing and help resist infection with help from calendula, and relieve pain specifically from cuts with help from hypericum. I slathered it on my leg and ate a cup of tapioca pudding to strengthen my nerves, and continued on with my day.

A little bit on hypericum. I was unfamiliar with the name until I did some research. Turns out it is just another name for St. John's Wort, and that it noted as one of the finest medicinal oils used for bruises, sprains, burns and other injuries. Way to go, spider-herbal-sense! It is also best known as a remedy for depression and anxiety, and is a valued treatment for damaged nerve endings caused by burns, wounds, and other trauma to the skin.


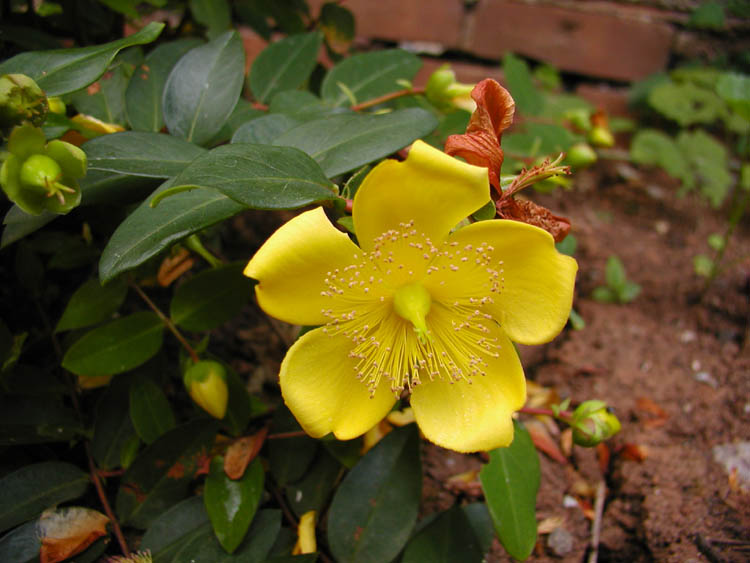
pretty St. John's Wort flower

Oh, and the flower of the plant is gorgeous. Look at that beautiful plant! It is sometimes used as an ornamental plant, but also grows as a weed in farmland and gardens. It can actually be quite a nuisance on range land, as it can cause problems to the cattle who may accidentally munch on it, causing them to abort their calves. It's a potent, mysterious, and strong plant.

A bottle of St. John's Wort oil, made from infusing virgin olive oil with the leaves and flowers, is a fantastic addition to any first aid kit, according to Rosemary Gladstar as well as other herbalists that I have met. If you can't find the fresh plant, the oil can be found at natural food stores. Just not at Whole Foods, apparently!

 calendula flower

Calendula, also known as marigold, is a plant I have known since childhood. Mom always had a tiny container of calendula salve in the cupboard. It is a powerful yellow flower that helps to promote cell repair and acts as an antiseptic. It's used for bruises, burns, and sores. We would slather it on just about anything.

It can also be used internally for gastrointenstinal problems such as ulcers, cramps, indigestion, and diarrhea, and it also can be used to soothe the skin. The number of pages that this herb appears on in my Herbal Recipes for Vibrant Health is pretty impressive. It shows up in salves to treat fungal infections, in tinctures made to treat herpes, in a healing mouthwash used to prevent trips to the dentist, in an astringent used as a hair rinse or aftershave, in an herbal bath for babies, in a tea made to treat chicken pox or measles... ok, I need to stop. This was just a handful of the remedies I've found in my book.

I think you get the picture. Calendula is a MUST for any first aid kit.


Oh, by the way. Just look at my wound HOURS after I hit it on the bus. Do you see a bruise? I don't. It looked like this just 15 minutes after I took my arnica tablets and placed some ice on it. Just another leg saved by arnica.

A small bottle of homeopathic arnica montana is also a must for any herbal first aid. Or, I'd recommend carrying it with you in your purse. You never know when you'll get hit by a bus. Or hit a bus yourself.

As a review, in my first aid kit will go-
1. My calendula and St. John's Wort cream
2. My arnica tablets

In the future, I'll include a tea blend with calendula and other herbs for indigestion. I'll also include St. John's Wort oil or tincture for those injuries that need a little love.

I would say this was a good use of a bad injury. Share your own stories about arnica, calendula, or St. John's Wort by commenting here, or ask me any questions you like! I would love to hear from you.

Wednesday, August 3, 2011

herbal first aid kit part 1


I want to begin utilizing my limited knowledge of herbalism, and have been thinking about what herbal product or project I can come up with in order to begin using it practically. After reading the first aid chapter in Rosemary Gladstar's book, I've decided on a project- an herbal first aid kit!

For this particular post, I'll discuss exactly what will go into my kit. This is a large project, especially if I am going to be making the majority of the products contained in the kit by hand, and so this is part one of many parts of my project.

Let's start with the container for this project.


I like the idea of this travel bag first aid kit, presented by Susan Belsinger of The Herb Companion, with its clear pockets. She suggests that everything in your kit be clearly labeled, and finds it helpful to include an instructional sheet for the use of each item.


 A toolbox is always a great idea to hold all of your items. It's durable and easy to organize. I believe that I'll be starting with a toolbox myself, although a smaller one than this. Mine is like a little suitcase that opens on both sides, so that you can see everything : ).


Although, I do like the idea of this pretty wooden sewing box.


There are also some basic first aid items that are important to include in any kind of first aid kit, including but not limited to the following:

• Sterile, nonstick bandages, assorted sizes
• Adhesive bandages, such as Band-Aids, assorted sizes

• Small scissors
• Thermometer
• Tweezers
• Needles/safety pins, assorted sizes
• Matches
• Candles
• Athletic tape
• Ice pack
• Alcohol swabs or small bottle of alcohol and cotton balls
• Toothpicks or natural floss

I've highlighted the things I'm going to include in my own kit, as I'm going to start with a smaller one. If you are going to go for a larger, more extensive kit, there are other  things to consider as well. If I can find the room in my kit, I'll definitely consider some of these items:

• Clean, washed muslin or cotton cheesecloth to use as a compress or for wrapping wounds and poultices.


• Wool socks with the toes cut open or sweater sleeves are perfect for holding poultices or bandages in place without using tape — just slide them over the arm, elbow, ankle, or leg. They also help retain heat on the affected area.
• Sports wrap— this stretchy and flexible wrap sticks to itself, and it is perfect for wrapping wounds or holding poultices.
• Moleskin — a soft fabric with an adhesive backing, ideal for covering tender spots like blisters.

Before I start on any of my own homemade remedies, I'm going to work on stocking my box with these simple items so that I'm ready to stock it with tinctures, liniments, salves, and oils. I also need to stock up on things like tiny jars, bottles, spritzers, and other items to store my remedies, which I hope to find at my local herbal supply store, the Chicago College of Healing Arts.

I'm super excited about starting this project! Check back as things progress, and build your own first aid kit along with me if you are so inspired.

P.S. Here are some other links to get you started, but they are by no means the end all be all:
Year of Nettle- The Herbal First Aid Kit
The Herb Companion- Make a Natural First Aid Kit

Thursday, July 28, 2011

meet your neighborhood weed, plantain


Wandering through the forest in North America and get a cut that gets infected, or feeling kind of constipated? If you know where to look, relief may be just under your feet.


Plantain is a plant that has naturalized in North America and can be found in fields, on roadsides, or even in the lawn. It is characterized by its broad oval leaves and a few spikes that feature greenish white or brown flowers from April to October. It is also known as a weed as it can quickly take over a lawn, but is highly valued as an herbal remedy since ancient times. I know that I have seen this plant in lawns that look uncared for, but until now have not realized the treasure chest that these lawns contain.


If you recognize the picture above, then you too have seen this little wonder-herb as well!


Plantain is known as the "green bandage" as it is a fantastic remedy for treating an infected area and soothing irritation externally. According to altnature.com,


"The chemical analysis of Plantgo Major reveals the remarkable glycoside Aucubin. Acubin has been reported in the Journal Of  Toxicology as a powerful anti-toxin. There are many more highly effective constituents in this plant including Ascorbic-acid, Apigenin, Baicalein, Benzoic-acid, Chlorogenic-acid, Citric-acid, Ferulic-acid, Oleanolic-acid, Salicylic-acid, and Ursolic-acid."


That is a lot of acids, but our ancestors must have sensed something magical about this herb, because Native Americans called this plant "life medicine" in their language.


 (CAUTION: graphic images of brown recluse spider bite if you click on image, but great usage of plantain!)


As seen in the picture above, Plantain can be used as a poultice by taking fresh leaves and clay (optional) and warm water and mixing it in a bowl. Place the mixture into clean gauze or muslin fabric and cover the infected area twice a day for 20 minutes or longer, depending on the infection. Other herbs can be mixed into the poultice to maximize results as well.


Plantain seeds, also known as psyillium seeds, are from a particular species of plantain and are an effective laxative when blended with other herbs such as licorice, fennel seed, yellow dock root, and senna. Make sure you do your research or get advice from a practiced herbalist before making your own blends, as herbs like senna can create dependencies if used too often. Plantain seed is rich in mucilage and helps to bulk stool, and it is an active ingredient in Metamucil.


Here are some links to other resources about plantain, if I have your interest peaked-
Dick Contino on Plantain
Dr. Christophers's Herbal Legacy on Plantain 


But that's not all. You know me, I love to share recipes. As I have already shared the wonderful effects of violets, I think that it would be appropriate to share this recipe for an infused oil from Sarah Powell who has a wonderful blog and has also created Lilith's Apothecary, an herbal body product shop on Etsy. She seems to know her herbal products and has many creams that are difficult to make for a new herbalists getting their feet wet (aka, me!).

She suggests using this oil for diaper rash or other irritations of the skin, or on wounds to help them heal.


NOTE: This recipe is a bit more intensive than others that I have posted. It would be best done on a cool day as you have to dry the herbs in an open oven. But I still think it's a great recipe.Check out the link below for the salve recipe that uses the infused oil as well!


****************************************


Step 1: Gather approximately 2 cups violet leaves and flowers and plantain leaves (either the narrow or wide leafed varieties).

Step 2: Try to clean off the leaves as much as possible without washing them. If they must be washed, do so, but be sure that the leaves are thoroughly wilted and absent of all moisture before adding the oil. Putting the oven on the lowest possible heat, arrange the herbs on a tray, preferably with the oven door open, and allow the leaves to wilt until you are sure no moisture remains. You are not diminishing the healing power of the herbs but rather, just removing more of the water content.

Step 3: Put the wilted leaves into a clean, very dry glass mason jar, or similar container, and fill to the top if possible. Then add the oil of choice (olive, grape seed, sweet almond, sunflower and safflower all work well) until you have filled the jar. Stir with a long spoon or chopstick until all bubbles have risen to the surface. Add a bit of Rosemary Oil Extract to prevent oil rancidity and further protect the oils. Just remember that water causes mold, so the drier your herbs and containers are, the more protected your oil is. Place some wax paper over the top of the container and then cap with a canning lid. Be aware that the oils may ‘weep’ while it steeps, so you may want to put a cup saucer under the jar.

Step 4: Place jar in a cool, dark place. Occasionally turn the jar upside down and then right side up to move the oil through the herbs and to try to keep all parts of the herbs covered with oil. Feel free to open it up and check on the herbs. If you see leaves poking through where there is some mold growth, remove the leaves and discard. If mold grows throughout the oil, you’ll have to toss the whole batch, as there is no saving the oil, even if it is heated. Steep 2-6 weeks.

Step 5: After 2-6 weeks, strain out the herbs using a cheesecloth and pour the infused oil into a clean, dry jar for storage. A dark glass container is best. You can keep this in the refrigerator for better storage or just store in a cool, dark place.


*********************

 Keep your eye out for that plantain, folks. It might be right under your feet!

Friday, July 22, 2011

taking oats beyond oatmeal


While eating my granola and yogurt this morning, I recalled to myself that I needed to update my blog with a new post. As I munched on my chewy granola, inspiration hit.

Folks, oats aren't just for breakfast. Oats are actually an herbal plant, full of vitamins and minerals, and useful for many different illnesses and imbalances.

Feeling stressed and overworked? Are you anxious? Do you have burns or hemorrhoids in need of tender loving care? If so, oats should become a regular part of your diet. According to Rosemary Gladstar in her book Herbal Recipes for Vibrant Health, they are among one of the best nerve and cardiac tonic herbs.

Here is a quick list of ailments that oats can assist with:
decreased energy
nervous disorders
depression, anxiety
low sexual vitality
urinary incontinence
nicotine and other chemical withdrawals
those healing from a long illness without an appetite
and last but not least, itchy skin (as many of us know!)


The important thing to realize about oats are that along with the grain, the green milky tops and stalks are used in herbal medicine. For calming nerves, a tea can be made from the grains and stalks and can be mixed with other herbs such as lemon balm and passion-flower, or with valerian to help one sleep.

The website Global Herbal Supplies gives great suggestions on how one might use oats as an emollient (external agent used to soften or smooth) or demulcent (demulcent=substance than soothes inflamed mucous membranes and protects from irritation). How about as a foot bath for tired feet or as a facial scrub for those suffering from acne?

I myself utilize a wonderful recipe called Miracle Grains for a facial scrub. It was recommended by Rosemary Gladstar in the book mentioned earlier. I've even convinced my man to use it, and he requests it when we run out. It's powerful stuff.


MIRACLE GRAIN

2 parts white clay (although I use a stronger version!)
1 cup finely ground oats
1/4 cup finely ground almonds
1/8 cup finely ground lavender
1/8 cup poppy seeds or finely ground blue corn
1/8 cup finely ground rose petals
I also add lavender essential oil or other oils 

1. Combine all the ingredients. Store the grains next to the sink in a glass container or in spice jars with shaker tops.
2. To use, mix 1-2 teaspoons of grains with water. Stir into a paste and gently massage on the face. Rinse with warm water.

Easy-peasy. Try it yourself! I keep mine in a recycled jar and use a little shell to scoop it out. It's great on your face, or all over your body.

Enjoy your oats, folks!